Author: imoliveira88

  • Empty datatable in Python/Django, even if the referred query returns a non-empty set

    Hey, there! How are you doing?

    I guess you’re facing an annoying (but quite easy to solve) problem… am I right? Well, no more talk, let’s go ahead!

    I can bet that the problem is that you didn’t put the desired set of components in a context variable. But what am I talking about?

    See, in your views.py you need to have something like:

    1. Creating the Context in views.py

    @login_required
    def notifica_modelo(request, id):
        modelos = Modelo.objects.all
        notificar_clientes_modelo(id)
        context = {'modelos': modelos}
        return render(request, "pages/envia_notificacoes.html", context)
    

    In that piece of code, the method notifica_modelo stores all the Modelo objects in the variable context, which is just a dictionary containing key-value pairs.

    2. Accessing the Context in the Template

    To improve your understanding, here is the partial template envia_notificacoes.html:

    {% load static %}
    {% load bootstrap_icons %}
    
    <div class="container-lista">
        <h2>Enviar notificações</h2>
        <br>
        <table id="datatable">
            <tr>
                <th>Notificação</th>
                <th>&nbsp;</th>
                <th>&nbsp;</th>
            </tr>
            {% for modelo in modelos %}
            <tr>
                <td>{{ modelo.assunto }}</td>
                <td>
                    <a href="{% url 'exibe_modelo' modelo.id %}">
                        {% bs_icon 'search' color='blue' %}
                    </a>
                </td>
                <td>
                    <a href="{% url 'notifica_modelo' modelo.id %}">
                        {% bs_icon 'send' color='blue' %}
                    </a>
                </td>
            </tr>
            {% endfor %}
        </table>
    </div>


    By iterating through the variable modelos, the data is retrieved from the context dictionary passed from the view, and everything works smoothly.

    Final Thoughts

    See? Told you it was easy! If you have any questions or want to dive deeper, just drop a comment or message. Happy coding!

    — Igor Magalhães Oliveira

  • Creating a simple endpoint in Java and Spring Boot to authenticate using Active Directory

    Well, guys, how are you doing? Yes, I’ll be quite straightforward: I’ll show you a working code in Java using the framework Spring Boot and Windows Server Active Directory.

    Let me contextualize: you have Active Directory running in a Windows Server machine (not necessarily on the same machine as the current code) and, in order to harness the users’ authentication data from the company domain as the authentication method of a third-party software, you have to create an endpoint and make it available to the other software. You don’t need a VIEW in the MVC Architecture.

    Model class: AuthenticationRequest

    public class AuthenticationRequest {
        private String username;
        private String password;
    
        // Getters and setters
        public String getUsername() {
            return username;
        }
    
        public void setUsername(String username) {
            this.username = username;
        }
    
        public String getPassword() {
            return password;
        }
    
        public void setPassword(String password) {
            this.password = password;
        }
    }
    

    RestController: AuthenticationController

    import model.AuthenticationRequest;
    import java.util.Hashtable;
    import org.springframework.web.bind.annotation.PostMapping;
    import org.springframework.web.bind.annotation.RequestBody;
    import org.springframework.web.bind.annotation.RestController;
    import org.springframework.http.ResponseEntity;
    import org.springframework.http.HttpStatus;
    import javax.naming.*;
    import javax.naming.directory.*;
    
    @RestController
    public class AuthenticationController {
    
        @PostMapping("/authenticate")
        public ResponseEntity<String> authenticateUser(@RequestBody AuthenticationRequest request) {
            try {
                String username = request.getUsername();
                String password = request.getPassword();
    
                boolean isAuthenticated = authenticateWithActiveDirectory(username, password);
    
                if (isAuthenticated) {
                    return new ResponseEntity<>("User authenticated successfully", HttpStatus.OK);
                } else {
                    return new ResponseEntity<>("Authentication failed", HttpStatus.UNAUTHORIZED);
                }
            } catch (Exception e) {
                // Log the exception or handle it appropriately
                e.printStackTrace();
                return new ResponseEntity<>("Authentication failed. Erro", HttpStatus.UNAUTHORIZED);
                // return new ResponseEntity<>("An error occurred during authentication", HttpStatus.INTERNAL_SERVER_ERROR);
            }
        }
    
        private boolean authenticateWithActiveDirectory(String username, String password) {
            String ldapURL = "ldap://192.168.0.2:389";
    
            Hashtable<String, String> env = new Hashtable<>();
            env.put(Context.INITIAL_CONTEXT_FACTORY, "com.sun.jndi.ldap.LdapCtxFactory");
            env.put(Context.PROVIDER_URL, ldapURL);
            env.put(Context.SECURITY_AUTHENTICATION, "simple");
            env.put(Context.SECURITY_PRINCIPAL, username + "@intranet.company.com.br");
            env.put(Context.SECURITY_CREDENTIALS, password);
    
            try {
                DirContext context = new InitialDirContext(env);
                System.out.println("Conexão bem sucedida!");
                context.close();
                return true;
            } catch (AuthenticationException authEx) {
                System.out.println("Autenticação falhou: " + authEx.getMessage());
                return false;
            } catch (NamingException nex) {
                System.out.println("Falha ao tentar conectar com o servidor LDAP: " + nex.getMessage());
                return false;
            }
        }
    }
    

    Main Class

    import org.springframework.boot.SpringApplication;
    import org.springframework.boot.autoconfigure.SpringBootApplication;
    
    @SpringBootApplication
    public class MainApplication {
    
        public static void main(String[] args) {
            SpringApplication.run(MainApplication.class, args);
        }
    }
    

    application.properties file

    logging.level.org.springframework=INFO
    logging.level.com.example=DEBUG
    
    server.port=8444
    server.ssl.keystore=file:/C:/xampp/ssl/certificates/keystore.p12
    server.ssl.key-store-type=PKCS12
    server.ssl.key-store-password=pass
    server.ssl.key-alias=endpoint
    

    An important information is that we call this endpoint through an HTTPS POST request, so we need to generate the keystore.p12 file from the certificate provided by the certification authority. In case you don’t need to use SSL, you won’t need to worry about the last part of the previous file.

    Well… I have nothing else to say about it. It’s done! But… ah, yes! Before I go, let me remind you: please execute the Main Class and it will start your application server (like Tomcat), and your endpoint will be ready to receive and handle HTTPS requests.

    By Igor Magalhães Oliveira

  • String and StringBuider for Everybody!

    Hey! Are you one of the millions enthusiasts of String? Are you always doing something like str += “concatenate another string”?

    Pretty good! Uh… unfortunately I’m joking, but calm down. I do the diagnosis and provide you the medicines too.

    I explain: it turns out that a String object is immutable (each time you do “+=” you create another String object, with huge impact in processing time), while a StringBuilder is mutable and, because of that, far more efficient for that purpose.

    Use the String class when you need to store immutable data to be read later, like names, addresses, API endpoints, file paths… For all other cases (except multithreaded environments, where you might use StringBuffer), you’ll use StringBuilder.

    I give you some examples.

    Example 1: String concatenation

    StringBuilder message = new StringBuilder("Hello");
    message.append(" ");
    message.append("World!");
    System.out.println(message.toString());
    

    Example 2: Building dynamic strings

    StringBuilder jsonBuilder = new StringBuilder();
    jsonBuilder.append("{");
    jsonBuilder.append("\"name\": \"John\",");
    jsonBuilder.append("\"age\": 30");
    jsonBuilder.append("}");
    

    When you do a benchmarking test comparing String and StringBuilder, the results are awesome, as we see in the code below:

    int n = 10000;
    long startTime = System.nanoTime();
    long endTime;
    
    // Using String
    String result = "";
    for (int i = 0; i < n; i++) {
        result += "a";
    }
    endTime = System.nanoTime();
    long durationString = endTime - startTime;
    
    System.out.println("String concatenation took: " + durationString + " nanoseconds");
    
    // Using StringBuilder
    startTime = System.nanoTime();
    StringBuilder sb = new StringBuilder();
    for (int i = 0; i < n; i++) {
        sb.append("a");
    }
    String resultStringBuilder = sb.toString();
    endTime = System.nanoTime();
    long durationStringBuilder = endTime - startTime;
    
    System.out.println("StringBuilder concatenation took: " + durationStringBuilder + " nanoseconds");
    

    With the result as shown below:

    Well, for today it’s enough! See you soon!

    By Igor Magalhães Oliveira

  • How to enable your Redis to be seen and accept connections from everywhere

    Hello, everyone!

    The aim here is to write something as useful as fast for reading and at the end you’ll be able to access your Redis server from everywhere.

    Step 1: search the file redis.conf

    Usually, this file is under /etc/redis directory, if your system runs in a Linux OS, but you can check it using locate command (review this post):

    locate redis.conf
    

    Then, you have to edit it. If you’re using Windows you have to open it in the administrative mode in a tool like Notepad++; if you’re using Linux, you can do (inside the correct directory):

    sudo nano redis.conf
    

    Now, you’ll change the protected-mode parameter and comment the line with bind 127.0.0.1:

    In Linux, press CTRL+O (to save) and CTRL+X (to exit the nano editor), then restart Redis service:

    sudo service redis-service restart
    

    We’re done! Everything will run fine when your system tries to communicate with the Redis server.

    By Igor Magalhães Oliveira

  • Mastering Soft Skills: The Key to Thriving in the Tech and Programming World

    In the dynamic realm of technology, it’s not just about coding wizardry or mastering the latest programming languages. Soft skills play a pivotal role in shaping successful tech professionals. Whether you’re a seasoned developer or just stepping into the programming universe, honing these essential soft skills can elevate your career to new heights. Let’s dive into the most crucial soft skills that every tech enthusiast should cultivate:

    1. Communication Skills: While computers understand binary code, humans thrive on effective communication. Being able to articulate ideas, explain complex concepts, and collaborate with team members is indispensable. Clear communication fosters teamwork, prevents misunderstandings, and ensures project goals are met seamlessly.
    2. Problem-Solving Abilities: In the tech world, challenges are akin to puzzles waiting to be solved. Having strong problem-solving skills enables you to navigate through intricate coding conundrums, debug efficiently, and devise innovative solutions. Embrace challenges as opportunities for growth, and you’ll emerge as a proficient problem-solver.
    3. Adaptability and Flexibility: Technology evolves at breakneck speed, rendering yesterday’s innovations obsolete. Embrace change with open arms and cultivate adaptability. Whether it’s adapting to new programming paradigms, learning emerging technologies, or pivoting strategies mid-project, flexibility is the hallmark of a resilient tech professional.
    4. Attention to Detail: In programming, a missing semicolon can wreak havoc on your entire codebase. Paying meticulous attention to detail is non-negotiable. From debugging code to ensuring seamless user experiences, precision is the bedrock of quality in tech projects.
    5. Creativity and Innovation: The tech landscape thrives on innovation. Cultivate your creativity by thinking outside the box, experimenting with novel ideas, and challenging the status quo. Innovators drive technological advancements and reshape the future of industries.
    6. Time Management: In a fast-paced tech environment, time is of the essence. Efficiently managing your time ensures timely project deliveries, enhances productivity, and minimizes stress. Embrace productivity tools, prioritize tasks, and harness the power of time management techniques to thrive in the tech arena.
    7. Empathy and Emotional Intelligence: Behind every line of code lies the end user—a human with needs, preferences, and emotions. Empathy allows you to understand user perspectives, anticipate their requirements, and craft user-centric solutions. Strengthen your emotional intelligence to navigate interpersonal dynamics, resolve conflicts amicably, and foster a harmonious work environment.
    8. Continuous Learning Mindset: The tech landscape is a perpetual learning journey. Embrace a growth mindset, avidly pursue knowledge, and stay abreast of industry trends. Whether it’s attending workshops, enrolling in online courses, or participating in hackathons, never cease to expand your horizons.

    In conclusion, while technical prowess lays the foundation for success in the tech world, it’s the mastery of soft skills that sets exceptional professionals apart. Cultivate these essential soft skills, and watch as your career in technology and programming flourishes amidst the ever-evolving digital landscape. Sharpen your communication, unleash your creativity, and embrace change with resilience: your journey to tech excellence begins here!

    By Igor Magalhães Oliveira

  • Steps to becoming a SQL ninja: mastering COUNT, SUM, subqueries, JOIN and more

    Are you ready to level up your SQL skills and become a true ninja in database management? Mastering essential SQL functions like COUNT and SUM, as well as advanced techniques like subqueries and joins, is key to unlocking the full potential of your database.

    Here are some steps to help you on your journey to SQL mastery:

    Understanding COUNT and SUM

    Learn how to use COUNT to determine the number of rows in a table or to count specific occurrences of data. Master the art of SUM to calculate the total value of a numeric column or to aggregate data across multiple rows.

    Example 1:

    SELECT COUNT(*) FROM orders;
    

    Example 2:

    SELECT SUM(total_amount) FROM sales;
    

    For more details, give a look here.

    Harnessing the Power of Subqueries

    Explore the versatility of subqueries to perform complex queries within queries. Use them to filter, sort, and manipulate data dinamically:

    Example: SELECT * FROM employees WHERE department_id IN (SELECT department_id FROM departments WHERE department_name = ‘Finance’);

    Unleashing the Magic of Joins

    Mastering different types of joins like INNER JOIN, LEFT JOIN and FULL JOIN will put you in a higher position among your colleagues, as it enable you to do more complete and effective queries, providing meaningful insights.

    Source: https://learnsql.com/blog/learn-and-practice-sql-joins

    Example:

    SELECT orders.order_id, customers.customer_name
    FROM orders
    INNER JOIN customers ON orders.customer_id = customers.customer_id;
    

    By mastering these fundamental SQL concepts and techniques, you’ll be well on your way to becoming a ninja in database management. Remember to practice regularly, explore real-world examples, and never stop learning.

    By Igor Magalhães Oliveira

  • Mastering Git Command Line: Boost Your Development Workflow

    Mastering Git on the command line can significantly enhance your development workflow and collaboration efficiency. Recently, Visual Studio Code (VS Code) has become a standout tool for developers, offering powerful features—including its built-in terminal, which allows seamless use of the Git Command Line Interface (CLI).

    From personal experience, I’ve transitioned away from heavier IDEs like Eclipse, NetBeans, and Android Studio since adopting VS Code. Its lightweight yet powerful environment, combined with Git integration, makes it an excellent choice for modern development.

    To help you optimize your Git workflow, here are some essential best practices:

    1. Understanding Git Basics

    Start by mastering fundamental Git commands:

    • git init – Initialize a new repository
    • git add – Stage changes
    • git commit – Save changes with a meaningful message
    • git push – Upload changes to a remote repository

    These commands form the foundation of version control, enabling efficient change tracking.

    2. Adopting Branching Strategies

    A well-structured branching strategy keeps your codebase organized. Consider:

    • Feature branching – Isolate new features in separate branches
    • GitFlow – A structured workflow for larger projects (I’ll cover this in detail soon!)

    Use commands like git branch and git checkout (or git switch) to manage branches effortlessly.

    3. Committing Frequently & Effectively

    • Commit often – Small, frequent commits make tracking changes easier.
    • Write clear messages – Follow conventions like:
    feat: Add user authentication
    fix: Resolve login page bug

    This keeps your project history clean and understandable.

    4. Resolving Merge Conflicts Like a Pro

    Conflicts are inevitable in collaborative projects. Learn to resolve them efficiently with:

    • git merge – Combine branches
    • git rebase – Rewrite commit history for a cleaner log
    • VS Code’s built-in conflict resolver for a visual approach

    5. Leveraging Terminal Shortcuts & Aliases

    Speed up your workflow with:

    • Bash/Zsh aliases – Shorten repetitive commands
    • Terminal customization – Optimize your shell for productivity

    Example alias:

    alias gs="git status"

    6. Integrating Git with VS Code

    VS Code’s Source Control panel provides a visual Git interface, allowing you to:

    • Stage & commit changes
    • View commit history
    • Manage branches without leaving the editor

    7. Embracing Collaboration Tools

    Platforms like GitHub, GitLab, and Bitbucket enhance teamwork with:

    • Pull requests – Facilitate code reviews
    • Issue tracking – Manage bugs and enhancements
    • CI/CD pipelines – Automate testing and deployment

    Final Thoughts

    By adopting these practices, you’ll maximize the power of Git CLI and VS Code, streamlining version control and collaboration. Stay curious, explore new features, and continuously refine your workflow for peak efficiency.

    Happy coding!
    — Igor Magalhães Oliveira

  • Mastering SQL Joins: A Comprehensive Guide to Left, Inner, and Other Join Types

    SQL joins are indispensable tools for extracting meaningful insights from relational databases. Let’s delve into the nuances of left, inner, and other join types with concrete examples to enhance your SQL proficiency.

    However, first of all, let me introduce you to an image i like a lot. Look out and wonder a little bit about it, before going ahead in your reading. It depicts a pretty good Venn Diagram about JOINs:

    Source: https://commons.wikimedia.org/wiki/File:SQL_Joins.svg

    Left Join: A left join retrieves all records from the left table and matching records from the right table based on a common key. It includes unmatched records from the left table and NULL values for unmatched records from the right table.

    SELECT employees.name, departments.department_name
    FROM employees e
    LEFT JOIN departments d ON e.department_id = d.department_id;
    

    In this example, the left join retrieves employee names along with their corresponding department names. It ensures that all employee records are included, even if there are no corresponding department records.

    Inner Join: An inner join selects records from both tables where there is a match based on the join condition. It excludes unmatched records from either table.

    SELECT orders.order_id, customers.customer_name
    FROM orders o
    INNER JOIN customers c ON o.customer_id = c.customer_id;
    

    In this example, the inner join retrieves order IDs along with the corresponding customer names. It only includes orders with matching customer records.

    Other Join Types: SQL supports additional join types, including right join, full outer join, and cross join.

    • Right Join: Similar to a left join but prioritizes all records from the right table.
    • Full Outer Join: Combines records from both tables, including unmatched records from either table.
    • Cross Join: Produces the Cartesian product of the two tables, resulting in every possible combination of rows.

    Conclusion: Mastering SQL joins is essential for effective data manipulation and analysis. By understanding left, inner, and other join types, you can optimize your queries and extract valuable insights from your database.

    Experiment with different join scenarios, analyze query performance, and refine your SQL skills to become a proficient database developer. With a solid understanding of SQL joins, you’ll be equipped to tackle complex data challenges and drive informed decision-making.

    Continue exploring SQL join techniques, stay curious, and unlock the full potential of relational databases. Happy querying!

    This comprehensive guide to SQL joins provides concrete examples and insights into left, inner, and other join types, empowering you to optimize your SQL queries and leverage the full capabilities of relational databases.

    By Igor Magalhães Oliveira

  • Mastering Essential Command Line Tools: Grep, Find, Locate, Piping, Awk, Nano, and Xargs Demystified

    Welcome to a guide on essential command line tools. Let’s explore the functionality of grep, find, locate, piping, awk, nano, and xargs. These tools are indispensable for navigating and manipulating files and data in the command line environment.

    Grep

    Grep is a powerful tool for searching text files. It allows you to find specific patterns or text strings within files quickly.

    Example usages:

    grep "michael" names.txt #It searches for the word "michael" inside the file "names.txt that's in the current directory
    grep -r "michael" .. #It searches recursively for all the occurrences of the word "michael" in all the subdirectories of the current directory's parent directory
    grep -i "jovem" captura.txt #It searches for "jovem" in "captura.txt" file, but this time case insensitive
    

    Find

    Find helps you locate files and directories within the filesystem. It’s useful for searching for files based on various criteria like name, size, or modification date.

    Example usage:

    find . -name '*.txt' #It searches for all the files with extension "txt" located in the current directory
    

    Locate

    Locate provides a fast way to search for files on your system. It uses a pre-built database of filenames to quickly locate files without having to search the entire filesystem. This command is simply awesome: with two words you save time (and your job)!

    Example usage:

    locate pg_hba.conf
    

    In case you find nothing, but you’re sure that the file exists, maybe the indexes are outdated and you have to run (golden hint):

    sudo updatedb
    

    Piping

    Piping allows you to combine the output of one command with the input of another. It’s useful for chaining commands together to perform complex operations.

    Example usage:

    find . -name "*.txt" | grep -i "africa" #It will give you all the occurrences of the word "africa" (case insensitive) in all the txt files in the current directory
    

    Awk

    Awk is a versatile text processing tool. It allows you to manipulate and analyze text data using simple scripts.

    Example usage:

    awk '{print $1}' file.txt #It shows the first word or element of each line from file.txt
    

    Nano

    Nano is a lightweight text editor that’s easy to use. It’s ideal for making quick edits to files in the command line environment.

    Example usage:

    nano filename
    

    Xargs

    Xargs is used to build and execute command lines from standard input. It’s useful for processing large sets of data or files.

    Example usage:

    find . -name '*.tmp' | xargs rm #It deletes all the .tmp files from the current directory
    

    These command line tools are essential for performing various tasks efficiently. Whether you’re searching for files, manipulating text data, or editing files, mastering these tools will enhance your productivity on the command line.

    By Igor Magalhães Oliveira

  • My beloved SQL: practical, illustrated, introductory examples

    I know that you had one of the experiences:

    1. Dealing with a troublesome third-party system where the easier “solution” to some issue is hammering the database;
    2. Producing some advanced report;
    3. Trying to find clues on data.

    If you don’t know what i’m talking about, maybe you have to worry yourself. I explain: it means that you never faced a challenging professional experience, or you’re beginning in the incredible world of IT. Anyway, here is not the place to waste time with it, let’s go ahead!

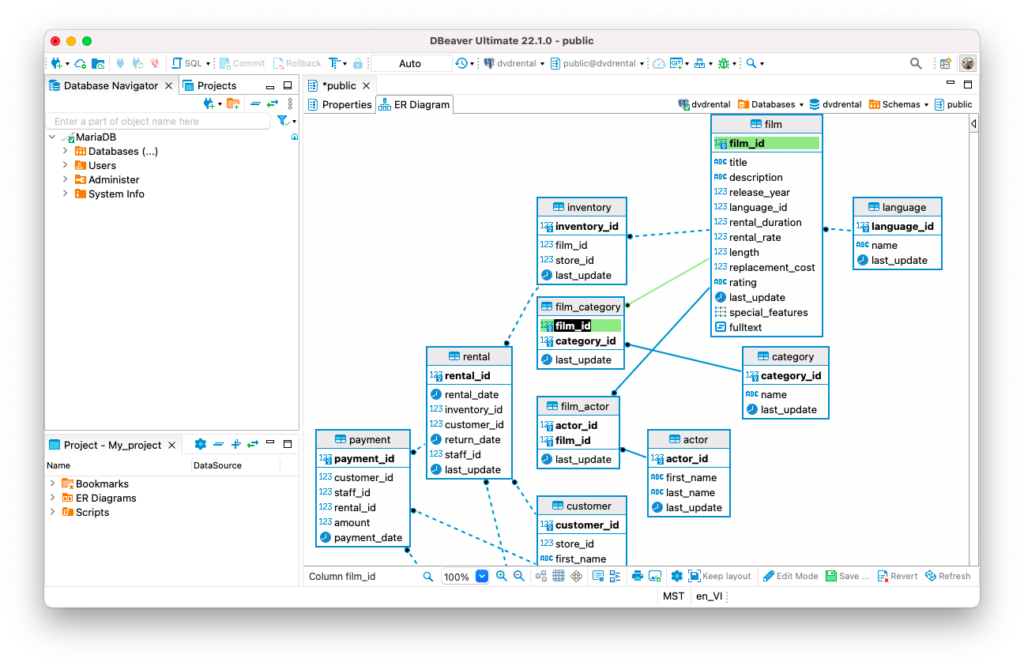
    See the picture below, where we show an Entity-Relationship Diagram featured in DBeaver software (i strongly recommend using this universal database management tool – it supports various DataBase Management Systems):

    Source: https://dbeaver.com/2022/06/30/two-ways-to-use-erd-in-dbeaver/

    Using this model, imagine we need to show all the rows of ACTOR table where the first_name field has the string “OLIV”. Easy task:

    SELECT * FROM ACTOR WHERE UPPER(FIRST_NAME) LIKE '%OLIV%'
    

    Quite good! We used the operator LIKE along with the brilliant strategy of uppercasing first_name before comparison.

    Now you need to show the name of the actors and the names of the movies they acted. Too easy:

    SELECT a.first_name AS ACTOR_NAME, f.title AS MOVIE_NAME
    FROM actor a, film f, film_actor fa
    WHERE f.film_id = fa.film_id AND a.actor_id = fa_actor_id
    ORDER BY a.first_name;
    

    You can do the same using INNER JOIN:

    SELECT a.first_name AS ACTOR_NAME, f.title AS MOVIE_NAME
    FROM film_actor fa
    INNER JOIN film f ON f.film_id = fa.film_id
    INNER JOIN actor a ON a.actor_id = fa_actor_id
    ORDER BY a.first_name;
    

    For now, it’s enough. Soon we’ll discuss about JOIN and subqueries (Click here). See you there, buds!

    By Igor Magalhães Oliveira